

Chapter 7: Comprehensive explanation of Dockerfile and novel container image construction techniques
1. The relationship between container and image
Speaking of containers managed by Docker, we have to mention container images because they serve as the templates for containers. It is through container images that we can quickly create containers.
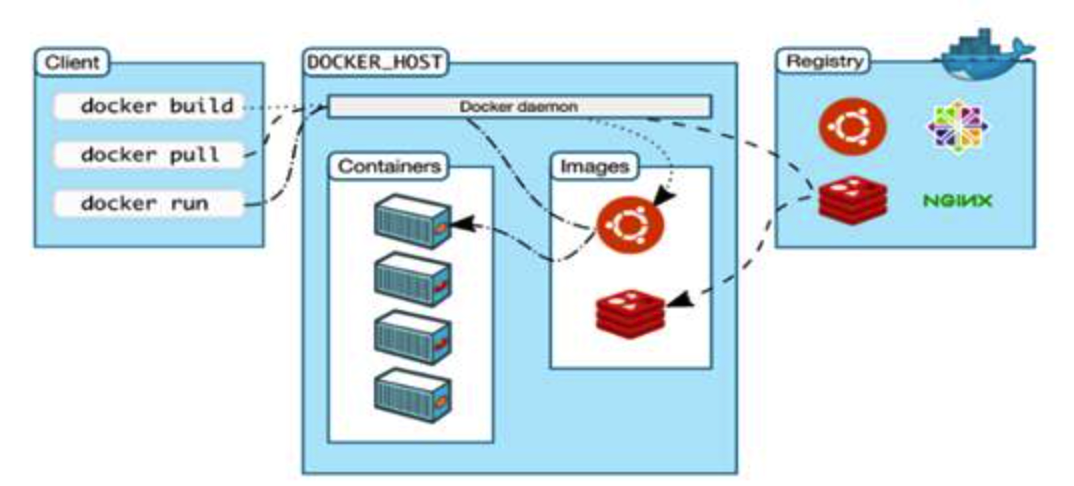
Docker Daemon creates containers using images
2. Classification of images
- OS
- CentOS
- Ubuntu
- Application
- Tomcat
- Nginx
- MySQL
- Redis
3. How to get images?
From DockerHub
Make the system-related files in an OS into image
Using docker commit to make a running container into a new image
Use Dockerfile to build an image
4. A demo using method 3 & 4 above
4.1 Make a running container into an image
4.1.1 Run a container firstly
docker run -it ubuntu
4.1.2 Install an app in the container
apt-get update -y && \
apt-get install apache2 -y && \
apt-get install systemctl && \
systemctl enable apache2 && \
systemctl start apache2
Please use curl localhost to verify whether the apache2 http server is running.
4.1.3 Make it into an image
root@master-01:~# docker ps
CONTAINER ID   IMAGE             COMMAND                  CREATED          STATUS         PORTS                                   NAMES
a83d4a14e3c6   ubuntu            "/bin/bash"              30 minutes ago   Up 3 minutes                                           brave_leakey
docker commit -a "Clarence" a83d4a14e3c6 ubuntu-apache2:v1
# sha256:dbc4bd399ef0c4e7c50425ff9de73711e121bbdf14cd960ed181ff62d90ea1bd
root@master-01:~# docker image ls
REPOSITORY       TAG       IMAGE ID       CREATED         SIZE
ubuntu-apache2   v1        a86e18671cbb   3 seconds ago   242MB
We can see that the size of the new image is bigger than the official ubuntu:latest image, that means we successfully added something into the iamge.
4.2 Use Dockerfile
4.2.1 Intro to Dockerfile
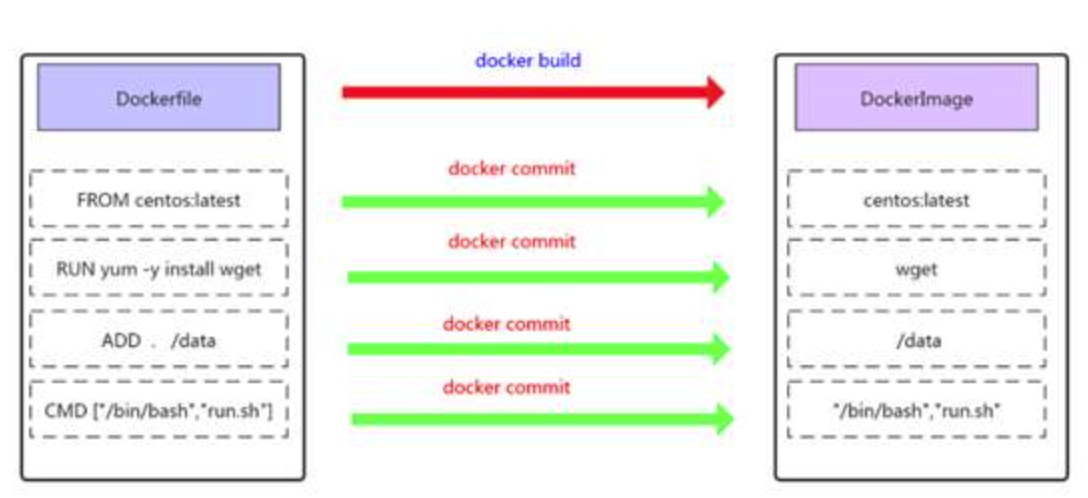
A Dockerfile is a script that can be interpreted by the Docker program. It is made up of a series of instructions, each with its own syntax and supported commands. When we need to specify additional requirements in a container image, we can add or modify instructions in the Dockerfile, and then use docker build to generate our custom container image.
4.2.2 Dockerfile commands
| Command | Description |
| FROM | The base image upon which the new image is built |
| LABEL | A tag |
| RUN | Shell commands executed during image build |
| COPY | Copy local file to image |
| ADD | Similar to COPY, but can auto-unzip zip files |
| ENV | Environment variables |
| USER | To specify the user to run commands for RUN, CMD and ENTRYPOINT |
| EXPOSE | To declare the service port for container runtime |
| WORKDIR | To set working directory for RUN, CMD, ENTRYPOINT, COPY and ADD |
| CMD | When running a container, the default CMD instruction is executed. If there are multiple CMD instructions, only the last one takes effect |
(man dockerfile can be used to for helping)
- FROM
The FROM instruction is used to specify the base image that will be used to build a new image in Dockerfile.
The FROM instruction must be the first line in the Dockerfile.
The base image specified by the FROM instruction can be from the official remote repository, or it can be in the local repository, with priority given to the local repository.
format: FROM <image>:<tag>
e.g.: FROM ubuntu:latest
- RUN
"The RUN instruction is used to execute commands during the image build process, and it has the following two formats:"
- shell format
format: RUN <commands>
e.g.: RUN echo 'hello world' > /var/www/html/index.html
- exec format
format: RUN ["executable file", "arg1", "arg2"]
e.g.: RUN ["/bin/bash", "-c", "echo 'hello' > /var/www/html/index.html"]
Note: From an optimization perspective, when there are multiple commands to be executed, do not use multiple RUN instructions. Instead, try to use the && and \ symbols to connect them into one line, because using multiple RUN instructions will create multiple layers in the image.
RUN yum install httpd httpd-devel -y
RUN echo test > /var/www/html/index.html

can be turned into:
RUN yum install httpd httpd-devel -y && echo test > /var/www/html/index.html

or:
RUN yum install httpd httpd-devel -y  \
    && echo test > /var/www/html/index.html
- CMD
CMD is different from RUN. CMD is used to specify the command to be executed when the container starts, while RUN is used to specify the command to be executed during image building.
There are 3 formats of CMD:
CMD ["executable","param1","param2"]
CMD ["param1","param2"]
CMD command param1 param2
Each Dockerfile can only have one CMD instruction. If multiple commands are specified, only the last one will be executed.
If the user specifies a command to run when starting the container, it will override the command specified by CMD.
What is command to run when starting a container?
docker run -d -p 80:80 [image_name] [commands]
- EXPOSE
The EXPOSE instruction is used to specify the port that the container will listen on during runtime.
format: EXPOSE <port> [<port>...]
e.g.: EXPOSE 80 3306 8080
The port mentioned above needs to be mapped to the host port using the -p parameter when running the container with docker run.
- ENV
The ENV instruction is used to specify an environment variable.
format: ENV <key> <value> or ENV <key>=<value>
e.g.: ENV JAVA_HOME=/usr/local/jdkxxxx/
- ADD
The ADD instruction is used to copy files from the host machine to the image.
format: ADD <src> <dest>
The <src> can be a local file or directory, a compressed file, or a URL. If <src> is a URL, then ADD works similarly to the wget command.

The <dest> path can be an absolute path within the container, or a relative path to the working directory.
- COPY
The COPY instruction is similar to the ADD instruction, but the source files for COPY can only be local files.
format: COPY <src> <dest>
- ENTRYPOINT
ENTRYPOINT is similar to CMD
Similarities: Only one instruction should be written per Dockerfile. If multiple instructions are written, only the last one will take effect.
Differences: If the user specifies a command to run when starting the container, the specified command will not override the ENTRYPOINT instruction, but it will override the CMD instruction.
There are two formats:
ENTRYPOINT ["executable", "param1", "param2"]
ENTRYPOINT command param1 param2
- VOLUME
The VOLUME instruction is used to map a directory on the host machine to a directory in the container.
When only specifying the mount point in the VOLUME instruction, Docker will create a new volume for the container, and the directory on the host machine that corresponds to the volume will be automatically generated.
format: VOLUME ["<mountpoint>"]
- USER
The USER instruction sets the user who starts the container (such as Hadoop requires Hadoop user operation, Oracle requires Oracle user operation), and can be either a username or UID.
USER daemon
USER 1001
Note: If the container is set to run as the daemon user, then RUN, CMD, and ENTRYPOINT will all run as that user. After the image build is complete, when running the container with docker run, you can use the -u parameter to override the specified user.
- WORKDIR
The WORKDIR instruction sets the working directory, similar to the cd command. It is not recommended to use RUN cd /root; instead, it is recommended to use the WORKDIR instruction.
WORKDIR /root
4.2.3 Use Dockerfile to build an image demo (nginx ubuntu)
Let's make a directory first:
mkdir nginx-image-make
cd nginx-image-make/
Make an html file:
echo "I am building an nginx image..." > index.html
Make a Dockerfile:
vim Dockerfile
--------------------------
# base image
FROM ubuntu
# author
MAINTAINER "clarencewhite9807@gmail.com"
# install nginx
RUN apt-get -y update && apt-get install nginx -y
# copy index.html from local to image
ADD index.html /var/www/html/index.nginx-debian.html
# make nginx as a foreground service
RUN echo "daemon off;" >> /etc/nginx/nginx.conf
# port in container
EXPOSE 80
# run the executable file on container start to start nginx service
CMD /usr/sbin/nginx
Build the image using Dockerfile:
docker build -t ubuntu-nginx:v1 .
Check the image we built just now:
docker image ls

REPOSITORY       TAG       IMAGE ID       CREATED        SIZE
ubuntu-nginx     v1        d8e8e2e8b89d   15 hours ago   163MB
Run the image as a container and check the default html page:
docker run ubuntu-nginx:v1 -d -p 9000:80

docker ps
-------------
CONTAINER ID   IMAGE             COMMAND                  CREATED        STATUS        PORTS                                   NAMES
9fce15688a3c   ubuntu-nginx:v1   "/bin/sh -c /usr/sbi…"   15 hours ago   Up 15 hours   0.0.0.0:9000->80/tcp, :::9000->80/tcp   condescending_ganguly

curl localhost:9000
-------------
I am building an nginx image...
4.3 Optimizing container image generation using Dockerfile
4.3.1 Reducing image layers
In a Dockerfile, there are multiple types of instructions. Among them, the RUN command is probably the most commonly used instruction when it comes to deployment. When using the RUN command, it is not recommended to use a separate RUN command for each installation. Instead, you can combine multiple installation commands into a single RUN command. This reduces the number of image layers.
Bad version:
FROM centos:latest
RUN yum install epel-release -y
RUN yum install -y gcc gcc-c++ make -y
RUN wget http://docs.php.net/distributions/php-5.6.36.tar.gz
RUN tar zxf php-5.6.36.tar.gz
RUN cd php-5.6.36
RUN ./configure --prefix=/usr/local/php
RUN make -j 4
RUN make install
EXPOSE 9000
CMD ["php-fpm"]
Better version:
FROM centos:latest
RUN yum install epel-release -y && \
    yum install -y gcc gcc-c++ make

RUN wget http://docs.php.net/distributions/php-5.6.36.tar.gz && \
    tar zxf php-5.6.36.tar.gz && \
    cd php-5.6.36 && \
    ./configure --prefix=/usr/local/php && \
    make -j 4 && make install
EXPOSE 9000
CMD ["php-fpm"]
4.3.2 Cleaning up unused data
- When using the RUN command in a Dockerfile, every time a new layer is created. If files are not deleted in the same layer where they were created, they will be carried on to another layer regardless of whether they are ultimately deleted or not. Therefore, it's important to clean up any residual data in each layer to minimize the size of the image.
- Additionally, it's recommended to delete the application software packages used during the container image generation process.
FROM centos:latest

RUN yum install epel-release -y && \
    yum install -y gcc gcc-c++ make gd-devel libxml2-devel \
    libcurl-devel libjpeg-devel libpng-devel openssl-devel \
    libmcrypt-devel libxslt-devel libtidy-devel autoconf \
    iproute net-tools telnet wget curl && \
    yum clean all && \
    rm -rf /var/cache/yum/*

RUN wget http://docs.php.net/distributions/php-5.6.36.tar.gz && \
    tar zxf php-5.6.36.tar.gz && \
    cd php-5.6.36 && \
    ./configure --prefix=/usr/local/php \
    make -j 4 && make install && \
    cd / && rm -rf php*
4.3.3 Multi-stage build image
There are two types of project container images: one copies the project code directly into the container image, which can be launched directly when using the container image the next time; and another type compiles the project source code and then copies it to the container image.
Both methods make the process of creating an image more complex and can result in large container images. It is recommended to use a multi-stage build approach to simplify the creation process and reduce the size of the container image.
An example:
FROM maven AS build
ADD ./pom.xml pom.xml
ADD ./src src/
RUN mvn clean package

FROM baizeyu/tomcat
RUN rm -rf /usr/local/tomcat/webapps/ROOT
COPY --from=build target/*.war /usr/local/tomcat/webapps/ROOT.war
The first stage uses the official Maven image as a base image and is named build. The ADD command is used to copy the pom.xml file and the source code files from the local directory to the container. The RUN command starts the Maven build process, which compiles the source code and generates the WAR file. The result of this stage is a new image with the compiled application ready for deployment in the next stage.
The second stage uses a custom Tomcat image named baizeyu/tomcat as the base image. The RUN command removes the default ROOT web application from the Tomcat container. The COPY command retrieves the previously built WAR file from the build stage using the --from flag and copies it to the Tomcat server's webapps directory with the name ROOT.war.