

Chapter 8: Deep analysis of Docker networking, achieving cross-host communication between containers using etcd+flannel
1. Default Docker Container Network Model
1.1 Diagram
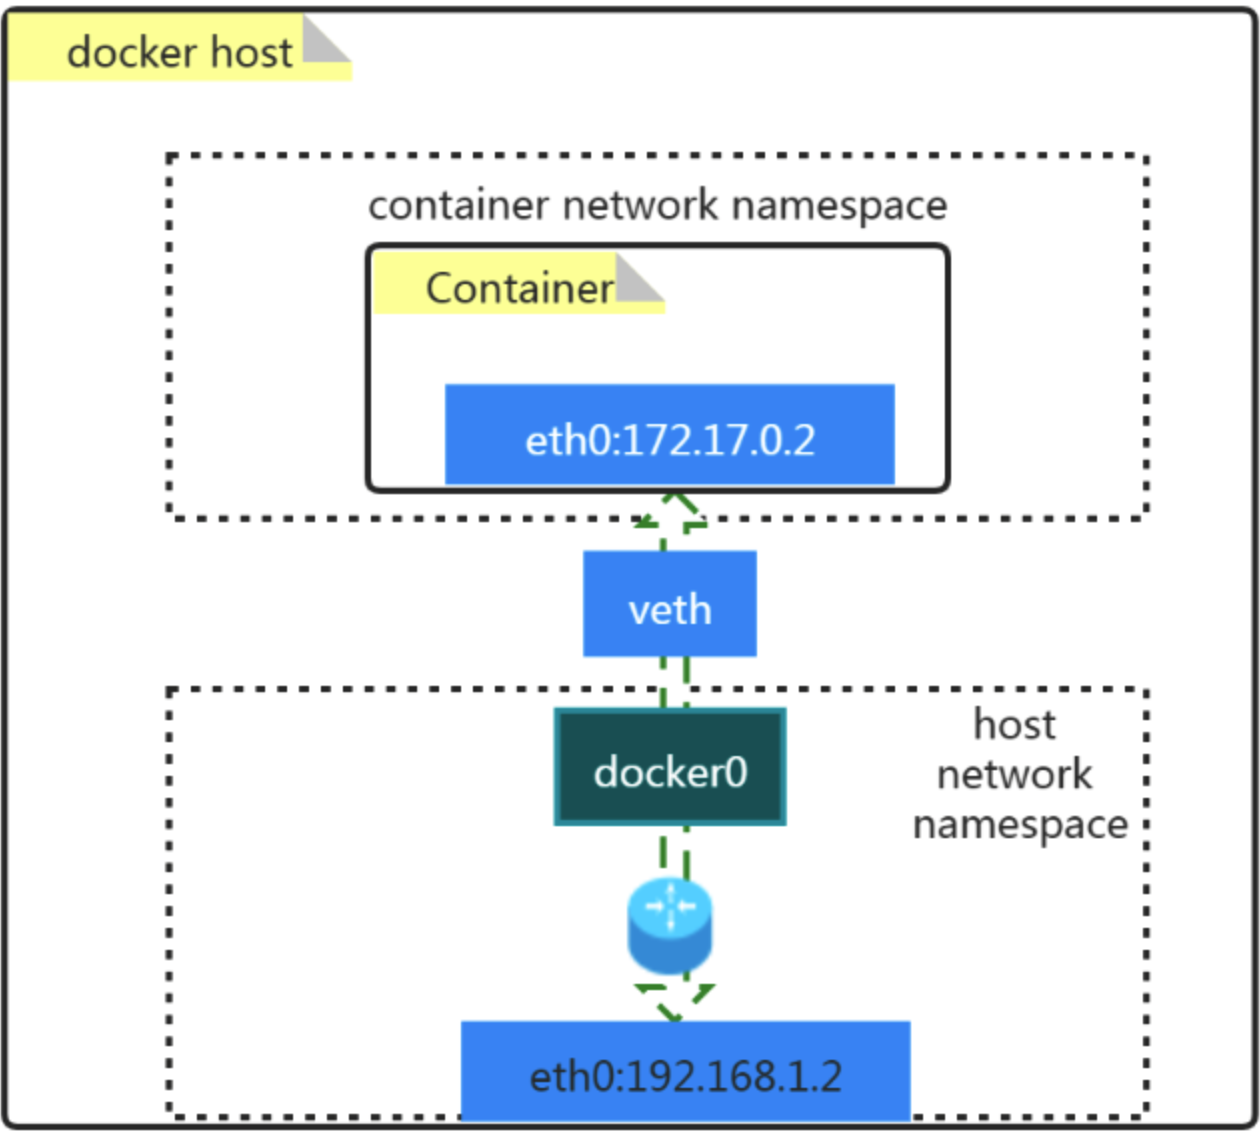
1.2 Concepts
- docker0
- It is a Layer2 (OSI model) network device, a bridge
- By using a bridge, different ports that are supported by Linux can be connected together.
- To achieve multi-to-multi communication similar to a switch, you can use a bridge network in Docker.
- veth pair
- It is a virtual ethernet device
- Appear in pairs, used to solve isolation between network namespaces.
- One end connected to Container network namespace, the other connected to the host network namespace
2. How does the default network model of Docker containers work?
2.1 From container to other networks

Let's run a container first:
docker run -d --name=app1 -p 9000:80 nginx:latest
On the host ubuntu machine, check the iptables:
iptables -t nat -vnL POSTROUTING
------------------
Chain POSTROUTING (policy ACCEPT 0 packets, 0 bytes)
 pkts bytes target     prot opt in     out     source               destination
  212 14431 MASQUERADE  all  --  *      !docker0  172.17.0.0/16        0.0.0.0/0
    0     0 MASQUERADE  tcp  --  *      *       172.17.0.2           172.17.0.2           tcp dpt:80
2.2 From other networks to container

We now have a container running with its port 80 exposed, also a portforward from host 9000 to it, let's check out the iptables on host machine:
iptables -t nat -vnL DOCKER
------------
Chain DOCKER (2 references)
 pkts bytes target     prot opt in     out     source               destination
    0     0 RETURN     all  --  docker0 *       0.0.0.0/0            0.0.0.0/0
    0     0 DNAT       tcp  --  !docker0 *       0.0.0.0/0            0.0.0.0/0            tcp dpt:9000 to:172.17.0.2:80
3. Four types of Docker networks
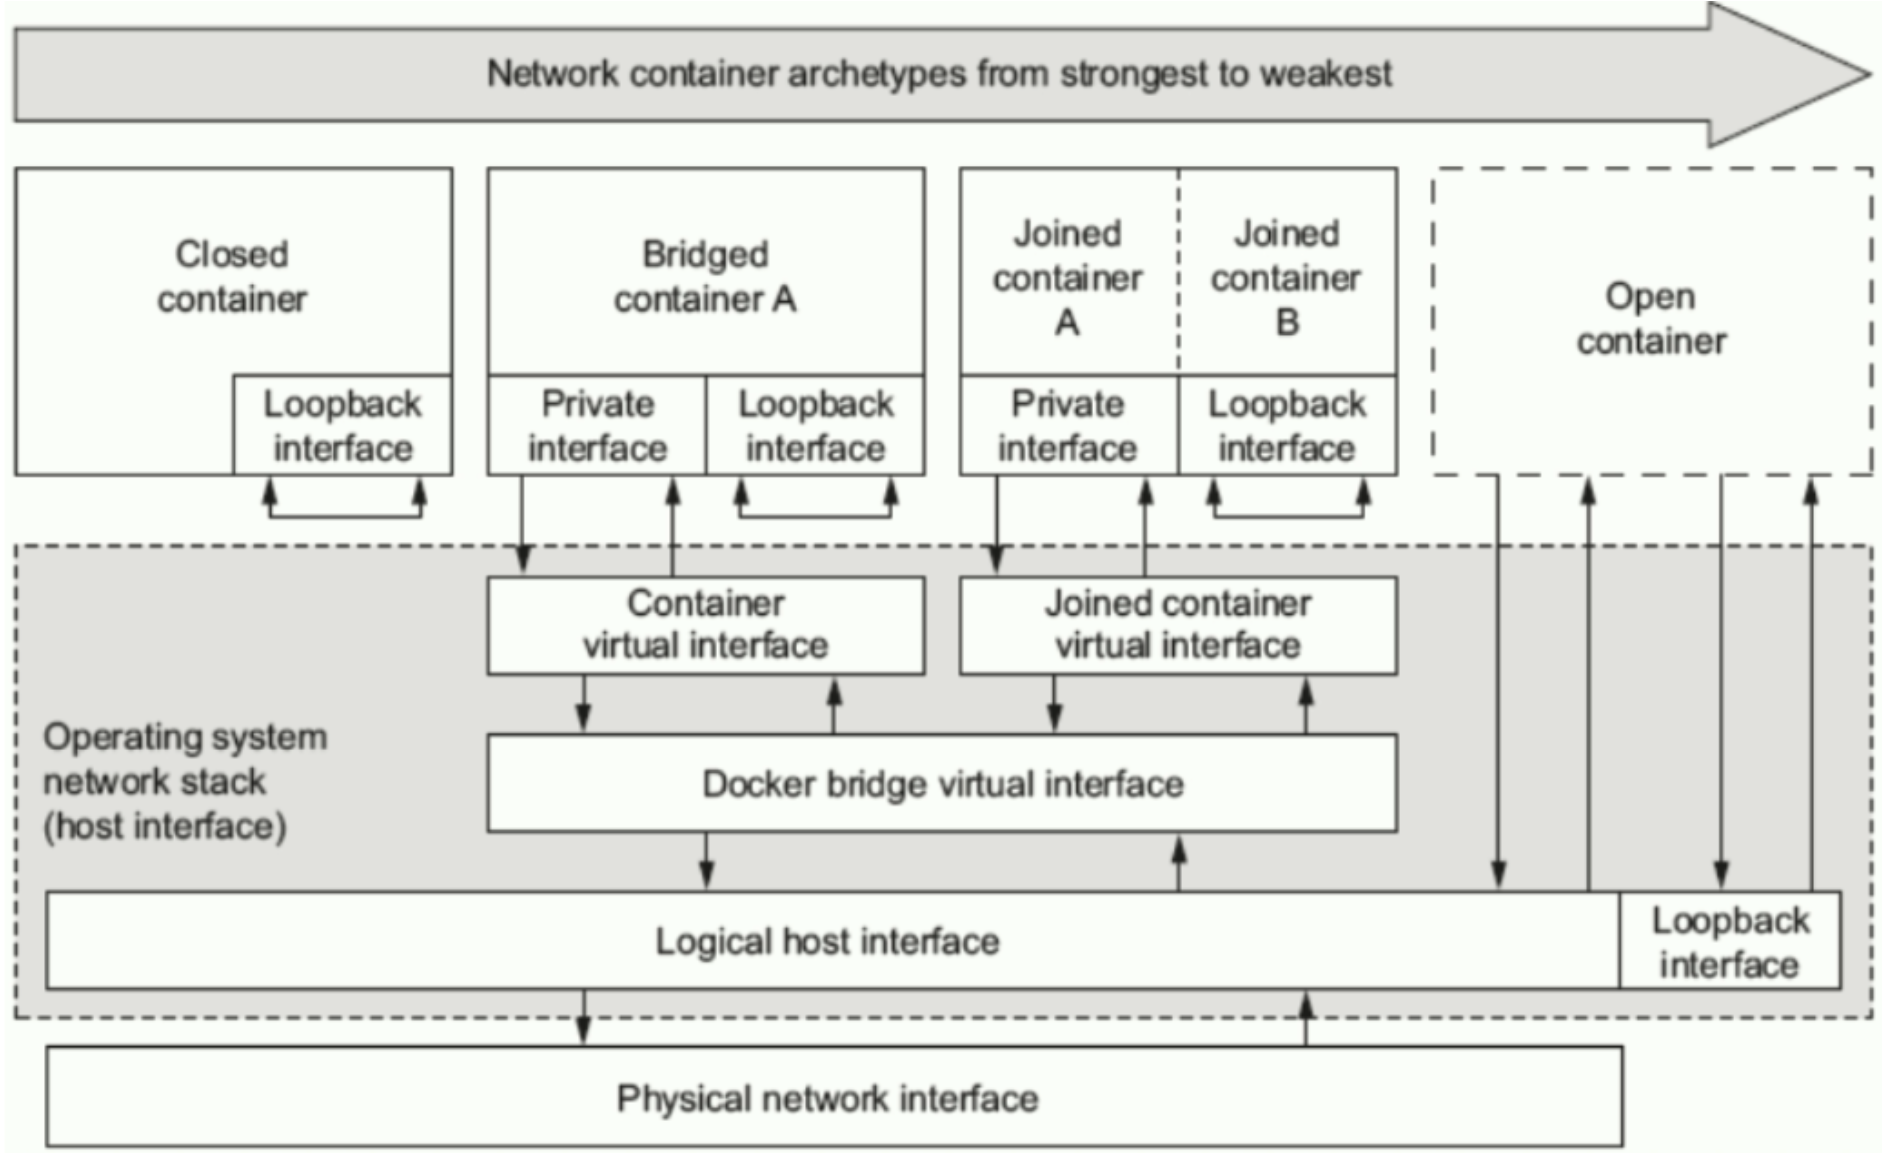
| Type | Usage | Explanation | |
| bridge [Bridge network] | --network bridge | Bridged containers have a private interface connected to the Docker bridge virtual interface, which is then connected to the physical network interface of the host machine through a logical host interface. A bridge network is assigned an IP address range by default, which is 172.17.0.0/16. If no network model is specified when creating a container, the default bridge network is used. This is why the IP addresses of containers created without specifying a network model are in the 172.17.0.0/16 subnet. | |
| host [Host network] | --network host | More open than a bridged network, a host network allows a container to directly share the host machine's network namespace. Therefore, the container can see as many network interfaces as the host machine has physical network interfaces. We can say that an open container is derived from a bridged network. | |
| none [No network] | --network none | A closed container with only the loopback interface and cannot communicate with the outside world. | |
| container [Joined container A \ | Joined container B] [Joined network] | --network container:<name or ID> | Each container has its own mount, PID, and user namespaces, but shares the same UTS, network, and IPC namespaces. As their network is shared, they can communicate via the loopback interface. They also have a private interface connected to the Docker bridge virtual interface, which is then connected to the physical network interface of the host machine through a logical host interface. |
4. Application and examples of Docker network
4.1 Check current network types
Check current network types in brief:
docker network ls
------------
NETWORK ID     NAME      DRIVER    SCOPE
0b4cf0e87225   bridge    bridge    local
6249aa42ee72   host      host      local
6bf470240b3b   none      null      local
Inspect network types:
docker network inspect bridge
----------------
[
    {
        "Name": "bridge",
        "Id": "0b4cf0e87225ac0a6f6381bdfb57fa3bb87c54ae93497a0b1d73a7b1dd6418ac",
        "Created": "2023-04-20T15:40:47.687436042+01:00",
        "Scope": "local",
        "Driver": "bridge",
        "EnableIPv6": false,
        "IPAM": {
            "Driver": "default",
            "Options": null,
            "Config": [
                {
                    "Subnet": "172.17.0.0/16",
                    "Gateway": "172.17.0.1"
                }
            ]
        },
        "Internal": false,
        "Attachable": false,
        "Ingress": false,
        "ConfigFrom": {
            "Network": ""
        },
        "ConfigOnly": false,
        "Containers": {
            "511752d687f722c87f873245ab51e41eef0e8f56ad78d88f3b10ca7fafc7d0df": {
                "Name": "app1",
                "EndpointID": "2b6d753792716e3b251eca087545751d3bf8c59a16f7f150c479f32184ec28fd",
                "MacAddress": "02:42:ac:11:00:02",
                "IPv4Address": "172.17.0.2/16",
                "IPv6Address": ""
            }
        },
        "Options": {
            "com.docker.network.bridge.default_bridge": "true",
            "com.docker.network.bridge.enable_icc": "true",
            "com.docker.network.bridge.enable_ip_masquerade": "true",
            "com.docker.network.bridge.host_binding_ipv4": "0.0.0.0",
            "com.docker.network.bridge.name": "docker0",
            "com.docker.network.driver.mtu": "1500"
        },
        "Labels": {}
    }
]
Check supported network types by Docker:
docker info | grep Network
-----------
  Network: bridge host ipvlan macvlan null overlay
4.2 Create specified network types
4.2.1 bridge
Check manual page:
docker network create --help
Let's create a bridge network using name 'mybridge0'
docker network create -d bridge --subnet "192.168.100.0/24" --gateway "192.168.100.1" -o com.docker.network.bridge.name=docker1 mybridge0
-----------------------
a928733f54ff9d886f97eea8e2e3af024ee354860aa3b53ce478e5bdb015e2b9
Check the network we created just now:
docker network ls
--------------------
NETWORK ID     NAME        DRIVER    SCOPE
0b4cf0e87225   bridge      bridge    local
6249aa42ee72   host        host      local
a928733f54ff   mybridge0   bridge    local
6bf470240b3b   none        null      local
Then check bridge on our host machine:
ip a s
--------------------
82: docker1: <NO-CARRIER,BROADCAST,MULTICAST,UP> mtu 1500 qdisc noqueue state DOWN group default
    link/ether 02:42:c0:2c:a1:2d brd ff:ff:ff:ff:ff:ff
    inet 192.168.100.1/24 brd 192.168.100.255 scope global docker1
       valid_lft forever preferred_lft forever
Next, let's start a container and connect it to the network we created just now:
docker run -it --network mybridge0 --rm busybox
--------------------------
/ # ifconfig
eth0      Link encap:Ethernet  HWaddr 02:42:C0:A8:64:02
          inet addr:192.168.100.2  Bcast:192.168.100.255  Mask:255.255.255.0
          UP BROADCAST RUNNING MULTICAST  MTU:1500  Metric:1
          RX packets:12 errors:0 dropped:0 overruns:0 frame:0
          TX packets:0 errors:0 dropped:0 overruns:0 carrier:0
          collisions:0 txqueuelen:0
          RX bytes:1112 (1.0 KiB)  TX bytes:0 (0.0 B)

lo        Link encap:Local Loopback
          inet addr:127.0.0.1  Mask:255.0.0.0
          UP LOOPBACK RUNNING  MTU:65536  Metric:1
          RX packets:0 errors:0 dropped:0 overruns:0 frame:0
          TX packets:0 errors:0 dropped:0 overruns:0 carrier:0
          collisions:0 txqueuelen:1000
          RX bytes:0 (0.0 B)  TX bytes:0 (0.0 B)
/ # exit
As we can see, the eth0 address of this container is what we configured in mybridge0 just now!
4.2.2 host
Inspect host type:
docker network inspect host
--------------------
[
    {
        "Name": "host",
        "Id": "6249aa42ee7246a026a5df16cc1e56b6f81bb398429315723f825dce21e92e48",
        "Created": "2023-04-19T16:36:33.457196045+01:00",
        "Scope": "local",
        "Driver": "host",
        "EnableIPv6": false,
        "IPAM": {
            "Driver": "default",
            "Options": null,
            "Config": []
        },
        "Internal": false,
        "Attachable": false,
        "Ingress": false,
        "ConfigFrom": {
            "Network": ""
        },
        "ConfigOnly": false,
        "Containers": {},
        "Options": {},
        "Labels": {}
    }
]
Let's create another busybox using host network type:
docker run -it --network host --rm busybox
--------------------------
/ # ifconfig
docker0   Link encap:Ethernet  HWaddr 02:42:7F:3F:7F:31
          inet addr:172.17.0.1  Bcast:172.17.255.255  Mask:255.255.0.0
          inet6 addr: fe80::42:7fff:fe3f:7f31/64 Scope:Link
          UP BROADCAST RUNNING MULTICAST  MTU:1500  Metric:1
          RX packets:19069 errors:0 dropped:0 overruns:0 frame:0
          TX packets:21837 errors:0 dropped:0 overruns:0 carrier:0
          collisions:0 txqueuelen:0
          RX bytes:1049180 (1.0 MiB)  TX bytes:374936966 (357.5 MiB)

docker1   Link encap:Ethernet  HWaddr 02:42:C0:2C:A1:2D
          inet addr:192.168.100.1  Bcast:192.168.100.255  Mask:255.255.255.0
          inet6 addr: fe80::42:c0ff:fe2c:a12d/64 Scope:Link
          UP BROADCAST MULTICAST  MTU:1500  Metric:1
          RX packets:0 errors:0 dropped:0 overruns:0 frame:0
          TX packets:5 errors:0 dropped:0 overruns:0 carrier:0
          collisions:0 txqueuelen:0
          RX bytes:0 (0.0 B)  TX bytes:526 (526.0 B)

eth0      Link encap:Ethernet  HWaddr EA:B7:35:7B:CD:09
          inet addr:100.115.93.74  Bcast:100.115.93.255  Mask:255.255.255.0
          inet6 addr: fe80::e8b7:35ff:fe7b:cd09/64 Scope:Link
          inet6 addr: fd00:30:31:0:e8b7:35ff:fe7b:cd09/64 Scope:Global
          UP BROADCAST RUNNING MULTICAST  MTU:65520  Metric:1
          RX packets:41712 errors:0 dropped:0 overruns:0 frame:0
          TX packets:31185 errors:0 dropped:0 overruns:0 carrier:0
          collisions:0 txqueuelen:1000
          RX bytes:908781796 (866.6 MiB)  TX bytes:2351185 (2.2 MiB)

lo        Link encap:Local Loopback
          inet addr:127.0.0.1  Mask:255.0.0.0
          inet6 addr: ::1/128 Scope:Host
          UP LOOPBACK RUNNING  MTU:65536  Metric:1
          RX packets:40 errors:0 dropped:0 overruns:0 frame:0
          TX packets:40 errors:0 dropped:0 overruns:0 carrier:0
          collisions:0 txqueuelen:1000
          RX bytes:4080 (3.9 KiB)  TX bytes:4080 (3.9 KiB)

vethf40e041 Link encap:Ethernet  HWaddr 56:95:0B:9D:EC:F8
          inet6 addr: fe80::5495:bff:fe9d:ecf8/64 Scope:Link
          UP BROADCAST RUNNING MULTICAST  MTU:1500  Metric:1
          RX packets:0 errors:0 dropped:0 overruns:0 frame:0
          TX packets:18 errors:0 dropped:0 overruns:0 carrier:0
          collisions:0 txqueuelen:0
          RX bytes:0 (0.0 B)  TX bytes:1436 (1.4 KiB)

/ #exit
Wow, this information is exact the same as our host machine.
Hint: you can also run an Nginx container that uses host type, then go to http://localhost on your host machine to verify this.
4.2.3 none
Inspect none type:
docker network inspect none
-------------------------
[
    {
        "Name": "none",
        "Id": "6bf470240b3bd3b99c08fd06e5e06e97bde830e23e1a97ffe89a5c6ea0b8b118",
        "Created": "2023-04-19T16:36:33.450201607+01:00",
        "Scope": "local",
        "Driver": "null",
        "EnableIPv6": false,
        "IPAM": {
            "Driver": "default",
            "Options": null,
            "Config": []
        },
        "Internal": false,
        "Attachable": false,
        "Ingress": false,
        "ConfigFrom": {
            "Network": ""
        },
        "ConfigOnly": false,
        "Containers": {},
        "Options": {},
        "Labels": {}
    }
]
Let's test this type of network using busybox container:
docker run -it --network none --rm busybox
-------------------------
/ # ifconfig
lo        Link encap:Local Loopback
          inet addr:127.0.0.1  Mask:255.0.0.0
          UP LOOPBACK RUNNING  MTU:65536  Metric:1
          RX packets:0 errors:0 dropped:0 overruns:0 frame:0
          TX packets:0 errors:0 dropped:0 overruns:0 carrier:0
          collisions:0 txqueuelen:1000
          RX bytes:0 (0.0 B)  TX bytes:0 (0.0 B)

/ # exit
It only has loopback address, nothing more!
4.2.4 Shared networks
Firstly, create a container that uses the default network type bridge:
docker run -it --name c1 --rm busybox
---------------------
/ # ifconfig
eth0      Link encap:Ethernet  HWaddr 02:42:AC:11:00:03
          inet addr:172.17.0.3  Bcast:172.17.255.255  Mask:255.255.0.0
          UP BROADCAST RUNNING MULTICAST  MTU:1500  Metric:1
          RX packets:6 errors:0 dropped:0 overruns:0 frame:0
          TX packets:0 errors:0 dropped:0 overruns:0 carrier:0
          collisions:0 txqueuelen:0
          RX bytes:516 (516.0 B)  TX bytes:0 (0.0 B)

lo        Link encap:Local Loopback
          inet addr:127.0.0.1  Mask:255.0.0.0
          UP LOOPBACK RUNNING  MTU:65536  Metric:1
          RX packets:0 errors:0 dropped:0 overruns:0 frame:0
          TX packets:0 errors:0 dropped:0 overruns:0 carrier:0
          collisions:0 txqueuelen:1000
          RX bytes:0 (0.0 B)  TX bytes:0 (0.0 B)

/ # exit
Then create another contianer who will share the same network with c1:
docker run -it --name c2 --network container:c1 --rm busybox
----------------------
eth0      Link encap:Ethernet  HWaddr 02:42:AC:11:00:03
          inet addr:172.17.0.3  Bcast:172.17.255.255  Mask:255.255.0.0
          UP BROADCAST RUNNING MULTICAST  MTU:1500  Metric:1
          RX packets:8 errors:0 dropped:0 overruns:0 frame:0
          TX packets:0 errors:0 dropped:0 overruns:0 carrier:0
          collisions:0 txqueuelen:0
          RX bytes:656 (656.0 B)  TX bytes:0 (0.0 B)

lo        Link encap:Local Loopback
          inet addr:127.0.0.1  Mask:255.0.0.0
          UP LOOPBACK RUNNING  MTU:65536  Metric:1
          RX packets:0 errors:0 dropped:0 overruns:0 frame:0
          TX packets:0 errors:0 dropped:0 overruns:0 carrier:0
          collisions:0 txqueuelen:1000
          RX bytes:0 (0.0 B)  TX bytes:0 (0.0 B)

/ # exit
Did you see? They have the same network address! Let's verify this by starting an httpd service in c2 and access it via c1:
/ # echo "hello " >> /tmp/index.html
/ # ls /tmp
------------
index.html
/ # httpd -h /tmp
/ # netstat -nlp (check port 80 status here)
------------
Active Internet connections (only servers)
Proto Recv-Q Send-Q Local Address           Foreign Address         State       PID/Program name
tcp        0      0 :::80                   :::*                    LISTEN      16/httpd
Active UNIX domain sockets (only servers)
Proto RefCnt Flags       Type       State         I-Node PID/Program name    Path
Go back to c1, visit localhost:
/ # wget localhost
-----------------
Connecting to localhost (127.0.0.1:80)
saving to 'index.html'
index.html           100% |********************************************************************************************************************************|    40  0:00:00 ETA
'index.html' saved

/ # cat index.html
-------------------------
I am verifying docker shared network...
Cool, we get it from c1!
Finally, let's check if they will share the file system in c1:
/ # cd /tmp/
/tmp # ls
/tmp #
Nothing under /tmp on c1, so they are only sharing the network.
5. Implementing communication between Docker containers across multiple hosts
5.1 The need for communication between Docker containers across multiple hosts
- Since the environment in which Docker containers run is similar to running services on a LAN, they cannot be accessed directly from outside. If port mapping is used on the Docker host, it can lead to serious consumption of ports.
- This allows for easy access to services provided by containers running on different Docker hosts.
5.2 Solution for implementing communication between containers across Docker Hosts
5.2.1 Docker Native Solutions
- overlay
- Docker native overlay network based on VXLAN encapsulation
- macvlan
- Docker host NIC interface is logically divided into multiple sub-interfaces, each sub-interface identifies a VLAN, and the container interface is directly connected to the Docker Host
- NIC interface
- Forwarding to another Docker Host via routing policy
5.2.2 Third party programs
5.2.2.1 Tunnel Solutions
- Flannel
- Supports UDP and VLAN encapsulated transport
- Weave
- UDP and VXLAN support
- OpenvSwitch
- VXLAN and GRE protocol support
5.2.2.2 Routing Solutions
Calico
- Supports BGP protocol and IPIP tunneling
- Each host acts as a virtual route for communication between different host containers via the BGP protocol.
5.3 Flannel
5.3.1 Introduction to overlay network
Overlay networking is a new data format that encapsulates Layer 2 messages on top of IP messages through some agreed communication protocol without changing the existing network infrastructure. This not only makes full use of the proven IP routing protocol process data distribution; but also the use of extended isolated identification bits in Overlay technology enables the support of up to 16M users beyond the 4000 number limit of VLANs and allows broadcast traffic to be converted into multicast traffic when necessary to avoid broadcast data flooding.
As a result, Overlay networks are in fact the most dominant solution for container cross-node data transmission and routing today.
5.3.2 Introduction to Flannel
Flannel is an overlay network tool designed by the CoreOS team for Kubernetes to help every CoreOS host using Kuberentes have a full subnet. Flannel provides a virtual network for containers by assigning a subnet to each host. It is based on Linux TUN/TAP and uses UDP to encapsulate IP packets to create the overlay network and maintain the distribution of the network with the help of etcd. Flannel is a simple and easy way to configure a layer 3 network fabric designed for Kubernetes.
5.3.3 How Flannel Works
Flannel is a network planning service designed by the CoreOS team for Kubernetes. Simply put, it allows Docker containers created by different node hosts in a cluster to have a cluster-wide unique virtual IP address. In the default Docker configuration, each Node's Docker service is responsible for assigning IP addresses to the containers on that Node, but containers within a Node can access each other, but across a network of hosts (Nodes) they cannot communicate with each other. containers on different nodes can obtain "same intranet" and "non-duplicate" IP addresses, and allow containers on different nodes to communicate directly over the intranet IP. Flannel uses etcd to store configuration data and subnet assignment information. flannel starts up with a background process that first retrieves the configuration and list of subnets in use, then selects an available subnet and attempts to register it. etcd also stores the corresponding ip of each host. flannel uses the watch mechanism of etcd to monitor /coreos.com/network/subnets and maintains a routing table based on it. To improve performance, flannel has optimised the Universal TAP/TUN device to proxy the ip slicing between TUN and UDP. The following schematic illustrates this:
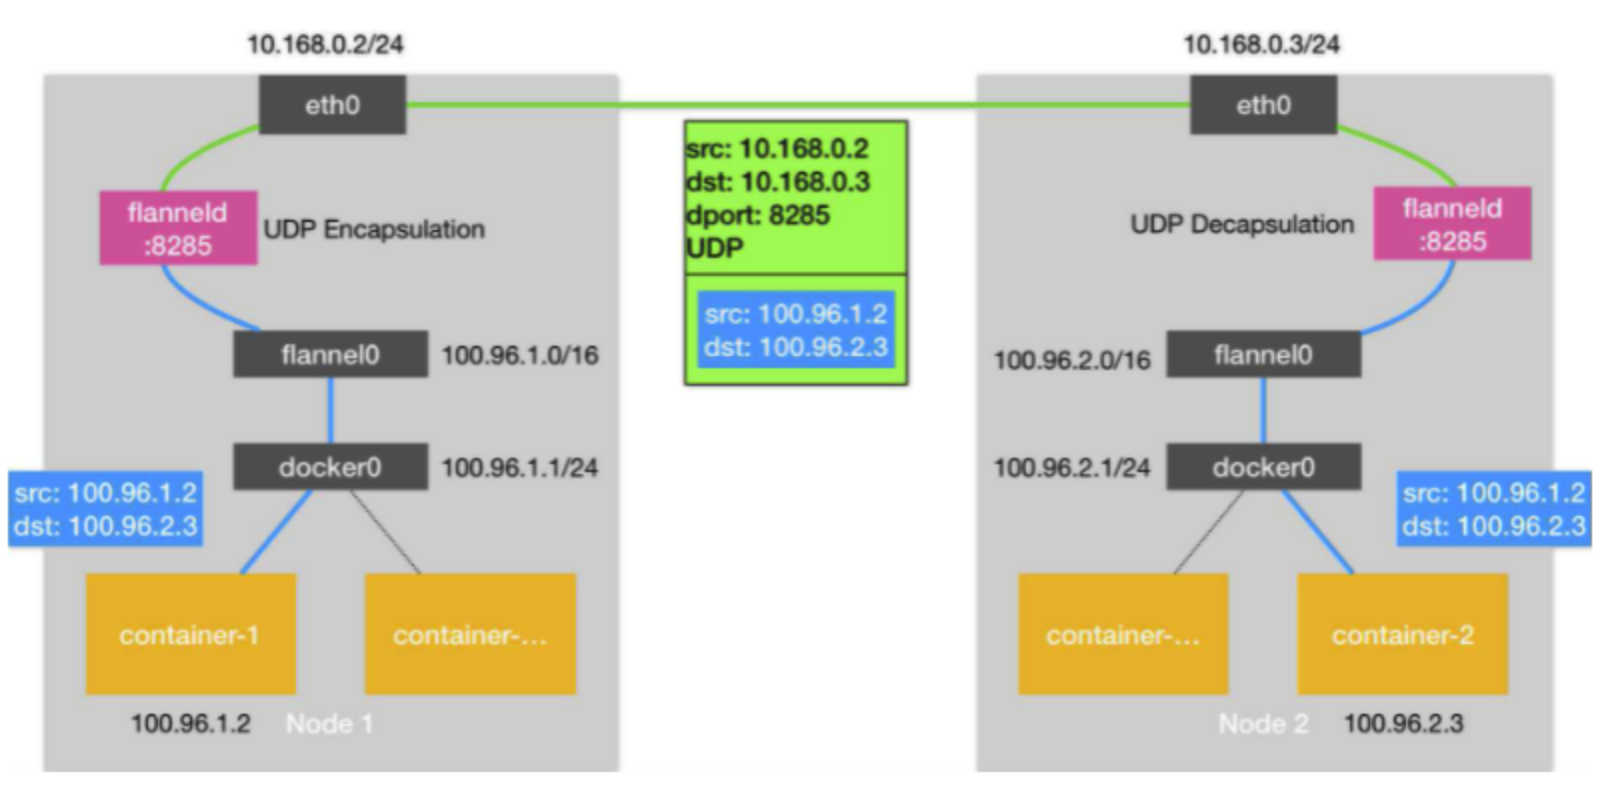
1. After the data is sent from the source container, it is forwarded via the docker0 virtual NIC on the host to the flannel0 virtual NIC, which is a P2P virtual NIC with the flanneld service listening on the other end of the NIC.
2. Flannel maintains an inter-node routing table via the Etcd service, which holds the subnet segment information for each node host.
3. The flanneld service of the source host encapsulates the original data content in UDP and delivers it to the flanneld service of the destination node according to its own routing table, where the data is unpackaged and then goes directly to the flannel0 virtual NIC of the destination node and then is forwarded to the docker0 virtual NIC of the destination host, and finally is routed by docker0 is routed to the destination container, just like local container communication.
5.4 ETCD
etcd is an open source project launched by the CoreOS team in June 2013, its goal is to build a highly available distributed key-value (key-value) database. etcd internally uses the raft protocol as the consistency algorithm, and etcd is implemented in the Go language.
etcd is used as a service discovery system and is characterised by:
- Simple: easy to install and configure, and provides an HTTP API for interaction, which is also simple to use
- Secure: supports SSL certificate validation
- Fast: according to the official benchmark data, a single instance supports 2k+ reads per second
- Reliable: draft algorithm for data availability and consistency in distributed systems
5.5 ETCD Deployment
Here we will use two Fedora Linux machines named with 'node-01' and 'node-02', both the host firewall and SELINUX should be turned off.
5.5.0 Turn off firewall and selinux
Check firewall status:
systemctl status firewalld
---------------------
○ firewalld.service - firewalld - dynamic firewall daemon
     Loaded: loaded (/usr/lib/systemd/system/firewalld.service; disabled; preset: enabled)
    Drop-In: /usr/lib/systemd/system/service.d
             └─10-timeout-abort.conf
     Active: inactive (dead)
       Docs: man:firewalld(1)
If firewall is running on your machine, just run these:
systemctl stop firewalld
systemctl disable firewalld
Check selinux:
sestatus
-------------------
SELinux status:                 disabled
If your SELinux status is active, do this:
vim /etc/selinux/config
--------------------------
SELINUX=disabled
Finally, don't forget to reboot!
5.5.1 Configure hostnames
hostnamectl set-hostname node1
hostnamectl set-hostname node2
5.5.2 Configure host ip addresses
As I already have ip addresses for both of my machine, so check them with:
(node-01)
ifconfig
----------------
enp0s5: flags=4163<UP,BROADCAST,RUNNING,MULTICAST>  mtu 1500
        inet 10.211.55.10  netmask 255.255.255.0  broadcast 10.211.55.255
        inet6 fe80::21c:42ff:fe95:201e  prefixlen 64  scopeid 0x20<link>
        inet6 fdb2:2c26:f4e4:0:21c:42ff:fe95:201e  prefixlen 64  scopeid 0x0<global>
        ether 00:1c:42:95:20:1e  txqueuelen 1000  (Ethernet)
        RX packets 12647  bytes 16599159 (15.8 MiB)
        RX errors 0  dropped 0  overruns 0  frame 0
        TX packets 3226  bytes 284194 (277.5 KiB)
        TX errors 0  dropped 0 overruns 0  carrier 0  collisions 0

lo: flags=73<UP,LOOPBACK,RUNNING>  mtu 65536
        inet 127.0.0.1  netmask 255.0.0.0
        inet6 ::1  prefixlen 128  scopeid 0x10<host>
        loop  txqueuelen 1000  (Local Loopback)
        RX packets 17  bytes 1008 (1008.0 B)
        RX errors 0  dropped 0  overruns 0  frame 0
        TX packets 17  bytes 1008 (1008.0 B)
        TX errors 0  dropped 0 overruns 0  carrier 0  collisions 0
(node-02)
enp0s5: flags=4163<UP,BROADCAST,RUNNING,MULTICAST>  mtu 1500
        inet 10.211.55.11  netmask 255.255.255.0  broadcast 10.211.55.255
        inet6 fdb2:2c26:f4e4:0:21c:42ff:fede:7aea  prefixlen 64  scopeid 0x0<global>
        inet6 fe80::21c:42ff:fede:7aea  prefixlen 64  scopeid 0x20<link>
        ether 00:1c:42:de:7a:ea  txqueuelen 1000  (Ethernet)
        RX packets 12030  bytes 16672288 (15.8 MiB)
        RX errors 0  dropped 0  overruns 0  frame 0
        TX packets 2528  bytes 190407 (185.9 KiB)
        TX errors 0  dropped 0 overruns 0  carrier 0  collisions 0

lo: flags=73<UP,LOOPBACK,RUNNING>  mtu 65536
        inet 127.0.0.1  netmask 255.0.0.0
        inet6 ::1  prefixlen 128  scopeid 0x10<host>
        loop  txqueuelen 1000  (Local Loopback)
        RX packets 17  bytes 1008 (1008.0 B)
        RX errors 0  dropped 0  overruns 0  frame 0
        TX packets 17  bytes 1008 (1008.0 B)
        TX errors 0  dropped 0 overruns 0  carrier 0  collisions 0
If there is no ip address on your virtual machine, you can add one via:
vim /etc/sysconfig/network-scripts/ifcfg-[interface-name]
---------------------------
IPADDR=[ip-address]
NETMASK=[netmask]
GATEWAY=[gateway-address]
---------------------------
systemctl restart network
5.5.3 Hostname and IP address resolution
For node1:
vim /etc/hosts
-------------------------
# Loopback entries; do not change.
# For historical reasons, localhost precedes localhost.localdomain:
127.0.0.1   localhost localhost.localdomain localhost4 localhost4.localdomain4
::1         localhost localhost.localdomain localhost6 localhost6.localdomain6
# See hosts(5) for proper format and other examples:
10.211.55.10 node1
10.211.55.11 node2
For node2:
vim /etc/hosts
-------------------------
# Loopback entries; do not change.
# For historical reasons, localhost precedes localhost.localdomain:
127.0.0.1   localhost localhost.localdomain localhost4 localhost4.localdomain4
::1         localhost localhost.localdomain localhost6 localhost6.localdomain6
# See hosts(5) for proper format and other examples:
10.211.55.10 node1
10.211.55.11 node2
5.5.4 Turn on forward
For both machines, enable ipv4 ip_forward:
vim /etc/sysctl.conf
--------------------
net.ipv4.ip_forward=1
sysctl -p
--------------
net.ipv4.ip_forward = 1
Finally, we need verify if they can communicate with each other by pinging each other.
5.5.5 etcd Installation
Same, install this on both:
yum update -y
yum install etcd -y
systemctl status etcd
-----------------------
○ etcd.service - Etcd Server
     Loaded: loaded (/usr/lib/systemd/system/etcd.service; disabled; preset: disabled)
    Drop-In: /usr/lib/systemd/system/service.d
             └─10-timeout-abort.conf
     Active: inactive (dead)
Now, etcd has been installed, we need to change configurations!
5.5.6 etcd Configuration
On node-01, change the config file into this:
vim /etc/etcd/etcd.conf
----------------------------
# [member]
ETCD_NAME="node1"
ETCD_DATA_DIR="/var/lib/etcd/node1.etcd"
#ETCD_WAL_DIR=""
#ETCD_SNAPSHOT_COUNT="10000"
#ETCD_HEARTBEAT_INTERVAL="100"
#ETCD_ELECTION_TIMEOUT="1000"
ETCD_LISTEN_PEER_URLS="http://0.0.0.0:2380"
ETCD_LISTEN_CLIENT_URLS="http://0.0.0.0:2379, http://0.0.0.0:4001"
#ETCD_MAX_SNAPSHOTS="5"
#ETCD_MAX_WALS="5"
#ETCD_CORS=""
#
#[cluster]
ETCD_INITIAL_ADVERTISE_PEER_URLS="http://10.211.55.10:2380"
# if you use different ETCD_NAME (e.g. test), set ETCD_INITIAL_CLUSTER value for this name, i.e. "test=http://..."
ETCD_INITIAL_CLUSTER="node1=http://10.211.55.10:2380, node2=http://10.211.55.11:2380"
#ETCD_INITIAL_CLUSTER_STATE="new"
#ETCD_INITIAL_CLUSTER_TOKEN="etcd-cluster"
ETCD_ADVERTISE_CLIENT_URLS="http://10.211.55.10:2379, http://10.211.55.10:4001"
#ETCD_DISCOVERY=""
#ETCD_DISCOVERY_SRV=""
#ETCD_DISCOVERY_FALLBACK="proxy"
#ETCD_DISCOVERY_PROXY=""
#ETCD_STRICT_RECONFIG_CHECK="false"
#ETCD_AUTO_COMPACTION_RETENTION="0"
#
#[proxy]
#ETCD_PROXY="off"
#ETCD_PROXY_FAILURE_WAIT="5000"
#ETCD_PROXY_REFRESH_INTERVAL="30000"
#ETCD_PROXY_DIAL_TIMEOUT="1000"
#ETCD_PROXY_WRITE_TIMEOUT="5000"
#ETCD_PROXY_READ_TIMEOUT="0"
#
#[security]
#ETCD_CERT_FILE=""
#ETCD_KEY_FILE=""
#ETCD_CLIENT_CERT_AUTH="false"
#ETCD_TRUSTED_CA_FILE=""
#ETCD_AUTO_TLS="false"
#ETCD_PEER_CERT_FILE=""
#ETCD_PEER_KEY_FILE=""
#ETCD_PEER_CLIENT_CERT_AUTH="false"
#ETCD_PEER_TRUSTED_CA_FILE=""
#ETCD_PEER_AUTO_TLS="false"
#
#[logging]
#ETCD_DEBUG="false"
# examples for -log-package-levels etcdserver=WARNING,security=DEBUG
#ETCD_LOG_PACKAGE_LEVELS=""
On node-02, change it to something similar:
vim /etc/etcd/etcd.conf
----------------------------
#[member]
ETCD_NAME="node2"
ETCD_DATA_DIR="/var/lib/etcd/node2.etcd"
#ETCD_WAL_DIR=""
#ETCD_SNAPSHOT_COUNT="10000"
#ETCD_HEARTBEAT_INTERVAL="100"
#ETCD_ELECTION_TIMEOUT="1000"
ETCD_LISTEN_PEER_URLS="http://0.0.0.0:2380"
ETCD_LISTEN_CLIENT_URLS="http://0.0.0.0:2379,http://0.0.0.0:4001"
#ETCD_MAX_SNAPSHOTS="5"
#ETCD_MAX_WALS="5"
#ETCD_CORS=""
#
#[cluster]
ETCD_INITIAL_ADVERTISE_PEER_URLS="http://10.211.55.11:2380"
# if you use different ETCD_NAME (e.g. test), set ETCD_INITIAL_CLUSTER value for this name, i.e. "test=http://..."
ETCD_INITIAL_CLUSTER="node1=http://10.211.55.10:2380,node2=http://10.211.55.11:2380"
#ETCD_INITIAL_CLUSTER_STATE="new"
#ETCD_INITIAL_CLUSTER_TOKEN="etcd-cluster"
ETCD_ADVERTISE_CLIENT_URLS="http://10.211.55.11:2379,http://10.211.55.11:4001"
#ETCD_DISCOVERY=""
#ETCD_DISCOVERY_SRV=""
#ETCD_DISCOVERY_FALLBACK="proxy"
#ETCD_DISCOVERY_PROXY=""
#ETCD_STRICT_RECONFIG_CHECK="false"
#ETCD_AUTO_COMPACTION_RETENTION="0"
#
#[proxy]
#ETCD_PROXY="off"
#ETCD_PROXY_FAILURE_WAIT="5000"
#ETCD_PROXY_REFRESH_INTERVAL="30000"
#ETCD_PROXY_DIAL_TIMEOUT="1000"
#ETCD_PROXY_WRITE_TIMEOUT="5000"
#ETCD_PROXY_READ_TIMEOUT="0"
#
#[security]
#ETCD_CERT_FILE=""
#ETCD_KEY_FILE=""
#ETCD_CLIENT_CERT_AUTH="false"
#ETCD_TRUSTED_CA_FILE=""
#ETCD_AUTO_TLS="false"
#ETCD_PEER_CERT_FILE=""
#ETCD_PEER_KEY_FILE=""
#ETCD_PEER_CLIENT_CERT_AUTH="false"
#ETCD_PEER_TRUSTED_CA_FILE=""
#ETCD_PEER_AUTO_TLS="false"
#
#[logging]
#ETCD_DEBUG="false"
# examples for -log-package-levels etcdserver=WARNING,security=DEBUG
#ETCD_LOG_PACKAGE_LEVELS=""
5.5.7 Check etcd status on both nodes
On node1:
systemctl status etcd
-------------------------
● etcd.service - Etcd Server
     Loaded: loaded (/usr/lib/systemd/system/etcd.service; enabled; preset: disabled)
    Drop-In: /usr/lib/systemd/system/service.d
             └─10-timeout-abort.conf
     Active: active (running) since Tue 2023-04-25 18:08:52 IST; 5min ago
   Main PID: 1278 (etcd)
      Tasks: 8 (limit: 2218)
     Memory: 13.9M
        CPU: 4.939s
     CGroup: /system.slice/etcd.service
             └─1278 /usr/bin/etcd

Apr 25 18:08:52 node1 bash[1278]: {"level":"info","ts":"2023-04-25T18:08:52.713+0100",>
Apr 25 18:08:52 node1 bash[1278]: {"level":"info","ts":"2023-04-25T18:08:52.714+0100",>
Apr 25 18:08:52 node1 bash[1278]: {"level":"info","ts":"2023-04-25T18:08:52.715+0100",>
Apr 25 18:08:52 node1 bash[1278]: {"level":"info","ts":"2023-04-25T18:08:52.717+0100",>
Apr 25 18:08:52 node1 bash[1278]: {"level":"info","ts":"2023-04-25T18:08:52.717+0100",>
Apr 25 18:08:52 node1 systemd[1]: Started etcd.service - Etcd Server.
Apr 25 18:08:52 node1 bash[1278]: {"level":"info","ts":"2023-04-25T18:08:52.718+0100",>
Apr 25 18:08:52 node1 bash[1278]: {"level":"info","ts":"2023-04-25T18:08:52.720+0100",>
Apr 25 18:08:52 node1 bash[1278]: {"level":"info","ts":"2023-04-25T18:08:52.720+0100",>
Apr 25 18:08:52 node1 bash[1278]: {"level":"info","ts":"2023-04-25T18:08:52.720+0100",
On node2:
systemctl status etcd
-------------------------
● etcd.service - Etcd Server
     Loaded: loaded (/usr/lib/systemd/system/etcd.service; enabled; preset: disabled)
    Drop-In: /usr/lib/systemd/system/service.d
             └─10-timeout-abort.conf
     Active: active (running) since Tue 2023-04-25 18:08:52 IST; 6min ago
   Main PID: 1081 (etcd)
      Tasks: 8 (limit: 2218)
     Memory: 14.9M
        CPU: 4.265s
     CGroup: /system.slice/etcd.service
             └─1081 /usr/bin/etcd

Apr 25 18:08:52 node2 bash[1081]: {"level":"info","ts":"2023-04-25T18:08:52.716+0100","c>
Apr 25 18:08:52 node2 bash[1081]: {"level":"info","ts":"2023-04-25T18:08:52.716+0100","c>
Apr 25 18:08:52 node2 bash[1081]: {"level":"info","ts":"2023-04-25T18:08:52.717+0100","c>
Apr 25 18:08:52 node2 bash[1081]: {"level":"info","ts":"2023-04-25T18:08:52.717+0100","c>
Apr 25 18:08:52 node2 bash[1081]: {"level":"info","ts":"2023-04-25T18:08:52.718+0100","c>
Apr 25 18:08:52 node2 systemd[1]: Started etcd.service - Etcd Server.
Apr 25 18:08:52 node2 bash[1081]: {"level":"info","ts":"2023-04-25T18:08:52.722+0100","c>
Apr 25 18:08:52 node2 bash[1081]: {"level":"info","ts":"2023-04-25T18:08:52.722+0100","c>
Apr 25 18:08:52 node2 bash[1081]: {"level":"info","ts":"2023-04-25T18:08:52.724+0100","c>
Apr 25 18:08:52 node2 bash[1081]: {"level":"info","ts":"2023-04-25T18:08:52.724+0100","c>
As etcd is using port 2380, if you have any errors/issues with starting it and set up the connection between nodes, just try to check if 2380 is opened, for example, if you want to verify the connectivity from node1 and node2, you can use the following methods:
use
telneton node1:dnf install telnet telnet node2 2380 --------------- Trying 10.211.55.11... Connected to node2. Escape character is '^]'. Connection closed by foreign host.use
nmapon node1:dnf install nmap nmap -p 2380 node2 ----------------- Starting Nmap 7.93 ( https://nmap.org ) at 2023-04-25 18:19 IST Nmap scan report for node2 (10.211.55.11) Host is up (0.00052s latency). PORT STATE SERVICE 2380/tcp open etcd-server MAC Address: 00:1C:42:DE:7A:EA (Parallels) Nmap done: 1 IP address (1 host up) scanned in 0.30 secondsuse
lsofon node2:lsof -i :2380 ------------- COMMAND PID USER FD TYPE DEVICE SIZE/OFF NODE NAME etcd 1081 etcd 3u IPv6 25415 0t0 TCP *:etcd-server (LISTEN) etcd 1081 etcd 13u IPv4 25419 0t0 TCP node2:39382->node1:etcd-server (ESTABLISHED) etcd 1081 etcd 15u IPv4 25435 0t0 TCP node2:39392->node1:etcd-server (ESTABLISHED) etcd 1081 etcd 16u IPv6 25437 0t0 TCP node2:etcd-server->node1:51804 (ESTABLISHED) etcd 1081 etcd 17u IPv6 25438 0t0 TCP node2:etcd-server->node1:51806 (ESTABLISHED) etcd 1081 etcd 18u IPv6 24346 0t0 TCP node2:etcd-server->node1:51814 (ESTABLISHED) etcd 1081 etcd 23u IPv4 25446 0t0 TCP node2:42870->node1:etcd-server (ESTABLISHED) etcd 1081 etcd 24u IPv6 24353 0t0 TCP node2:etcd-server->node1:51820 (ESTABLISHED)use
netstat:netstat -tunlp | grep -E '2380|4001' ---------------------- tcp6 0 0 :::2380 :::* LISTEN 1278/etcd tcp6 0 0 :::4001 :::* LISTEN 1278/etcd
5.5.8 Check the health of etcd cluster
etcdctl endpoint health
-----------------
127.0.0.1:2379 is healthy: successfully committed proposal: took = 6.241474ms
etcdctl member list
------------------
95085dc63d7deee3, started, node1, http://10.211.55.10:2380, http://10.211.55.10:2379,http://10.211.55.10:4001, false
bd93686a68a54c2d, started, node2, http://10.211.55.11:2380, http://10.211.55.11:2379,http://10.211.55.11:4001, false
(here 'false' indicates whether it is leader)
5.6 Flannel Deployment
5.6.1 Flannel Installation
This is the official releases of Flannel: https://github.com/flannel-io/flannel/releases
As I am using Apple M1 chip (arm64 arch), I will download the arm64 tar to my virtual Fedora machines:
wget https://github.com/flannel-io/flannel/releases/download/v0.21.4/flannel-v0.21.4-linux-arm64.tar.gz

ls
-----------
flannel-v0.21.4-linux-arm64.tar.gz

tar -xvzf flannel-v0.21.4-linux-arm64.tar.gz
ls
------------
flanneld  mk-docker-opts.sh  README.md
Then we are going to add flannel configuration to etcd via etcdctl:
For node1:
etcdctl --endpoints http://10.211.55.10:2379 put /coreos.com/network/config '{"Network": "10.0.0.0/16", "SubnetLen": 24, "SubnetMin": "10.0.1.0","SubnetMax": "10.0.20.0", "Backend": {"Type": "vxlan"}}'
--------------
OK
For node2:
etcdctl --endpoints http://10.211.55.11:2379 put /coreos.com/network/config '{"Network": "10.0.0.0/16", "SubnetLen": 24, "SubnetMin": "10.0.1.0","SubnetMax": "10.0.20.0", "Backend": {"Type": "vxlan"}}'
--------------
OK
5.6.2 Change flanneld Configuration
First copy the two extracted from our tar file to /usr/local/bin:
cp ~/flanneld /usr/local/bin
cp ~/mk-docker-opts.sh /usr/local/bin
Then change the systemd config, for node1:
vim /etc/systemd/system/flanneld.service
-------------------------
[Unit]
Description=Flanneld
Documentation=https://github.com/coreos/flannel
After=network.target
Before=docker.service

[Service]
User=root
ExecStartPost=/usr/local/bin/mk-docker-opts.sh
ExecStart=/usr/local/bin/flanneld \
--etcd-endpoints="http://10.211.55.10:2379,http://10.211.55.11:2379" \
--iface=10.211.55.10 \
--ip-masq=true \
--etcd-prefix=/coreos.com/network
Restart=on-failure
Type=notify
LimitNOFILE=65536

[Install]
WantedBy=multi-user.target
For node2:
vim /etc/systemd/system/flanneld.service
-------------------------
[Unit]
Description=Flanneld
Documentation=https://github.com/coreos/flannel
After=network.target
Before=docker.service

[Service]
User=root
ExecStartPost=/usr/local/bin/mk-docker-opts.sh
ExecStart=/usr/local/bin/flanneld \
--etcd-endpoints="http://10.211.55.10:2379,http://10.211.55.11:2379" \
--iface=10.211.55.11 \
--ip-masq=true \
--etcd-prefix=/coreos.com/network
Restart=on-failure
Type=notify
LimitNOFILE=65536

[Install]
WantedBy=multi-user.target
After modifying the systemd config, we need to reload the daemon and start flanneld:
systemctl daemon-reload
systemctl start flanneld
-------------------
● flanneld.service - Flanneld
     Loaded: loaded (/etc/systemd/system/flanneld.service; enabled; preset: disabled)
    Drop-In: /usr/lib/systemd/system/service.d
             └─10-timeout-abort.conf
     Active: active (running) since Tue 2023-04-25 23:47:01 IST; 13s ago
       Docs: https://github.com/coreos/flannel
    Process: 10162 ExecStartPost=/usr/local/bin/mk-docker-opts.sh (code=exited, status=0/SUCCESS)
   Main PID: 10129 (flanneld)
      Tasks: 9 (limit: 2218)
     Memory: 36.6M
        CPU: 335ms
     CGroup: /system.slice/flanneld.service
             └─10129 /usr/local/bin/flanneld --etcd-endpoints=http://10.211.55.10:2379,http://10.211.55.11:2379 --iface=10.211.55.10 --ip-masq=true --etcd-prefix=/coreos.com/net>

Apr 25 23:47:01 node1 flanneld[10129]: I0425 23:47:01.063815   10129 main.go:439] Running backend.
Apr 25 23:47:01 node1 flanneld[10129]: I0425 23:47:01.064017   10129 iptables.go:290] generated 3 rules
Apr 25 23:47:01 node1 flanneld[10129]: I0425 23:47:01.064061   10129 vxlan_network.go:64] watching for new subnet leases
Apr 25 23:47:01 node1 flanneld[10129]: I0425 23:47:01.076946   10129 registry.go:291] registry: watching subnets starting from rev 8
Apr 25 23:47:01 node1 flanneld[10129]: I0425 23:47:01.077123   10129 watch.go:51] Batch elem [0] is { subnet.Event{Type:0, Lease:subnet.Lease{EnableIPv4:true, EnableIPv6:false, >
Apr 25 23:47:01 node1 flanneld[10129]: I0425 23:47:01.080774   10129 local_manager.go:313] manager.WatchLease: sending reset results...
Apr 25 23:47:01 node1 flanneld[10129]: I0425 23:47:01.080815   10129 local_manager.go:390] Waiting for 22h59m58.99995396s to renew lease
Apr 25 23:47:01 node1 flanneld[10129]: I0425 23:47:01.102726   10129 iptables.go:283] bootstrap done
Apr 25 23:47:01 node1 flanneld[10129]: I0425 23:47:01.126716   10129 iptables.go:283] bootstrap done
Apr 25 23:47:01 node1 systemd[1]: Started flanneld.service - Flanneld.
Perfect!
5.6.3 View the configuration information generated by Flannel on each node
- Node1:
The config generated by flannel can be found here:
ls /run/flannel/
---------------
subnet.env

cat /run/flannel/subnet.env
---------------
FLANNEL_NETWORK=10.0.0.0/16
FLANNEL_SUBNET=10.0.13.1/24
FLANNEL_MTU=1450
FLANNEL_IPMASQ=true
Using ifconfig we can see that a network on the host machine named with 'flannel.1' has been created:
ifconfig
---------------
docker0: flags=4099<UP,BROADCAST,MULTICAST>  mtu 1500
        inet 172.17.0.1  netmask 255.255.0.0  broadcast 172.17.255.255
        inet6 fe80::42:a1ff:fe08:e168  prefixlen 64  scopeid 0x20<link>
        ether 02:42:a1:08:e1:68  txqueuelen 0  (Ethernet)
        RX packets 8309  bytes 348610 (340.4 KiB)
        RX errors 0  dropped 0  overruns 0  frame 0
        TX packets 50196  bytes 73261483 (69.8 MiB)
        TX errors 0  dropped 0 overruns 0  carrier 0  collisions 0

enp0s5: flags=4163<UP,BROADCAST,RUNNING,MULTICAST>  mtu 1500
        inet 10.211.55.10  netmask 255.255.255.0  broadcast 10.211.55.255
        inet6 fe80::21c:42ff:fe95:201e  prefixlen 64  scopeid 0x20<link>
        inet6 fdb2:2c26:f4e4:0:21c:42ff:fe95:201e  prefixlen 64  scopeid 0x0<global>
        ether 00:1c:42:95:20:1e  txqueuelen 1000  (Ethernet)
        RX packets 1257821  bytes 907345118 (865.3 MiB)
        RX errors 0  dropped 0  overruns 0  frame 0
        TX packets 784986  bytes 94347614 (89.9 MiB)
        TX errors 0  dropped 0 overruns 0  carrier 0  collisions 0

flannel.1: flags=4163<UP,BROADCAST,RUNNING,MULTICAST>  mtu 1450
        inet 10.0.13.0  netmask 255.255.255.255  broadcast 0.0.0.0
        inet6 fe80::407e:caff:fe8f:7c99  prefixlen 64  scopeid 0x20<link>
        ether 42:7e:ca:8f:7c:99  txqueuelen 0  (Ethernet)
        RX packets 0  bytes 0 (0.0 B)
        RX errors 0  dropped 0  overruns 0  frame 0
        TX packets 0  bytes 0 (0.0 B)
        TX errors 0  dropped 9 overruns 0  carrier 0  collisions 0

lo: flags=73<UP,LOOPBACK,RUNNING>  mtu 65536
        inet 127.0.0.1  netmask 255.0.0.0
        inet6 ::1  prefixlen 128  scopeid 0x10<host>
        loop  txqueuelen 1000  (Local Loopback)
        RX packets 9033  bytes 492352 (480.8 KiB)
        RX errors 0  dropped 0  overruns 0  frame 0
        TX packets 9033  bytes 492352 (480.8 KiB)
        TX errors 0  dropped 0 overruns 0  carrier 0  collisions 0
- Node2:
ls /run/flannel/
--------------------
subnet.env

cat /run/flannel/subnet.env
---------------------
FLANNEL_NETWORK=10.0.0.0/16
FLANNEL_SUBNET=10.0.14.1/24
FLANNEL_MTU=1450
FLANNEL_IPMASQ=true
ifconfig
------------------
enp0s5: flags=4163<UP,BROADCAST,RUNNING,MULTICAST>  mtu 1500
        inet 10.211.55.11  netmask 255.255.255.0  broadcast 10.211.55.255
        inet6 fe80::21c:42ff:fede:7aea  prefixlen 64  scopeid 0x20<link>
        inet6 fdb2:2c26:f4e4:0:21c:42ff:fede:7aea  prefixlen 64  scopeid 0x0<global>
        ether 00:1c:42:de:7a:ea  txqueuelen 1000  (Ethernet)
        RX packets 1330986  bytes 1038765119 (990.6 MiB)
        RX errors 0  dropped 0  overruns 0  frame 0
        TX packets 780934  bytes 77990387 (74.3 MiB)
        TX errors 0  dropped 0 overruns 0  carrier 0  collisions 0

flannel.1: flags=4163<UP,BROADCAST,RUNNING,MULTICAST>  mtu 1450
        inet 10.0.14.0  netmask 255.255.255.255  broadcast 0.0.0.0
        inet6 fe80::b455:9bff:fe5a:ac7c  prefixlen 64  scopeid 0x20<link>
        ether b6:55:9b:5a:ac:7c  txqueuelen 0  (Ethernet)
        RX packets 0  bytes 0 (0.0 B)
        RX errors 0  dropped 0  overruns 0  frame 0
        TX packets 0  bytes 0 (0.0 B)
        TX errors 0  dropped 9 overruns 0  carrier 0  collisions 0

lo: flags=73<UP,LOOPBACK,RUNNING>  mtu 65536
        inet 127.0.0.1  netmask 255.0.0.0
        inet6 ::1  prefixlen 128  scopeid 0x10<host>
        loop  txqueuelen 1000  (Local Loopback)
        RX packets 9528  bytes 500098 (488.3 KiB)
        RX errors 0  dropped 0  overruns 0  frame 0
        TX packets 9528  bytes 500098 (488.3 KiB)
        TX errors 0  dropped 0 overruns 0  carrier 0  collisions 0
5.7 Docker Configuration
I will only demo using node1 here, node2 should be the same.
Check docker env file:
cat /run/docker_opts.env
-----------------
DOCKER_OPT_BIP="--bip=10.0.13.1/24"
DOCKER_OPT_IPMASQ="--ip-masq=false"
DOCKER_OPT_MTU="--mtu=1450"
DOCKER_OPTS=" --bip=10.0.13.1/24 --ip-masq=false --mtu=1450"
Modify docker daemon service file:
vim /lib/systemd/system/docker.service
--------------------------
.......
[Service]
Type=notify
EnvironmentFile=-/run/docker_opts.env
# the default is not to use systemd for cgroups because the delegate issues still
# exists and systemd currently does not support the cgroup feature set required
# for containers run by docker
ExecStart=/usr/bin/dockerd \
          --host=fd:// \
          --exec-opt native.cgroupdriver=systemd \
          $DOCKER_OPTS
Reload daemon and restart docker:
systemctl daemon-reload
systemctl restart docker
Check ip address of docker and flannel:
ifconfig
--------------------
docker0: flags=4099<UP,BROADCAST,MULTICAST>  mtu 1500
        inet 10.0.13.1  netmask 255.255.255.0  broadcast 10.0.13.255
        inet6 fe80::42:a1ff:fe08:e168  prefixlen 64  scopeid 0x20<link>
        ether 02:42:a1:08:e1:68  txqueuelen 0  (Ethernet)
        RX packets 8309  bytes 348610 (340.4 KiB)
        RX errors 0  dropped 0  overruns 0  frame 0
        TX packets 50196  bytes 73261483 (69.8 MiB)
        TX errors 0  dropped 0 overruns 0  carrier 0  collisions 0

flannel.1: flags=4163<UP,BROADCAST,RUNNING,MULTICAST>  mtu 1450
        inet 10.0.13.0  netmask 255.255.255.255  broadcast 0.0.0.0
        inet6 fe80::407e:caff:fe8f:7c99  prefixlen 64  scopeid 0x20<link>
        ether 42:7e:ca:8f:7c:99  txqueuelen 0  (Ethernet)
        RX packets 0  bytes 0 (0.0 B)
        RX errors 0  dropped 0  overruns 0  frame 0
        TX packets 0  bytes 0 (0.0 B)
        TX errors 0  dropped 9 overruns 0  carrier 0  collisions 0
Cool, docker now joined flannel's network!
5.8 Verify the connectivity between docker containers on two hosts
Finally, let's run docker containers on two different hosts (node1 and node2), check if they can communicate with each other via etcd and flannel.
On node1:
docker run -it --name=busybox-node1 busybox
-----------------
/ # ifconfig
eth0      Link encap:Ethernet  HWaddr 02:42:0A:00:0D:02
          inet addr:10.0.13.2  Bcast:10.0.13.255  Mask:255.255.255.0
          UP BROADCAST RUNNING MULTICAST  MTU:1450  Metric:1
          RX packets:13 errors:0 dropped:0 overruns:0 frame:0
          TX packets:0 errors:0 dropped:0 overruns:0 carrier:0
          collisions:0 txqueuelen:0
          RX bytes:1154 (1.1 KiB)  TX bytes:0 (0.0 B)

lo        Link encap:Local Loopback
          inet addr:127.0.0.1  Mask:255.0.0.0
          UP LOOPBACK RUNNING  MTU:65536  Metric:1
          RX packets:0 errors:0 dropped:0 overruns:0 frame:0
          TX packets:0 errors:0 dropped:0 overruns:0 carrier:0
          collisions:0 txqueuelen:1000
          RX bytes:0 (0.0 B)  TX bytes:0 (0.0 B)

/ # ping 10.0.14.2
--------------------------
PING 10.0.14.2 (10.0.14.2): 56 data bytes
64 bytes from 10.0.14.2: seq=0 ttl=62 time=3.128 ms
64 bytes from 10.0.14.2: seq=1 ttl=62 time=1.523 ms
64 bytes from 10.0.14.2: seq=2 ttl=62 time=1.359 ms
On node2:
docker run -it --name=busybox-node2 busybox
-------------------
/ # ifconfig
eth0      Link encap:Ethernet  HWaddr 02:42:0A:00:0E:02
          inet addr:10.0.14.2  Bcast:10.0.14.255  Mask:255.255.255.0
          UP BROADCAST RUNNING MULTICAST  MTU:1450  Metric:1
          RX packets:19 errors:0 dropped:0 overruns:0 frame:0
          TX packets:0 errors:0 dropped:0 overruns:0 carrier:0
          collisions:0 txqueuelen:0
          RX bytes:1690 (1.6 KiB)  TX bytes:0 (0.0 B)

lo        Link encap:Local Loopback
          inet addr:127.0.0.1  Mask:255.0.0.0
          UP LOOPBACK RUNNING  MTU:65536  Metric:1
          RX packets:0 errors:0 dropped:0 overruns:0 frame:0
          TX packets:0 errors:0 dropped:0 overruns:0 carrier:0
          collisions:0 txqueuelen:1000
          RX bytes:0 (0.0 B)  TX bytes:0 (0.0 B)

/ # ping 10.0.13.2
PING 10.0.13.2 (10.0.13.2): 56 data bytes
64 bytes from 10.0.13.2: seq=0 ttl=62 time=0.805 ms
64 bytes from 10.0.13.2: seq=1 ttl=62 time=1.293 ms
64 bytes from 10.0.13.2: seq=2 ttl=62 time=1.117 ms
Well done! We can see that the newly created docker container will join the flannel network, we have achieved cross-host communication between Docker containers! 🥳